
A Toy Arm
Make a mechanical model of a human arm from popsicle sticks and rubber bands.
Kids love craft projects, and scientists find it very helpful to make models — simplified representations of complex or invisible things. Here is a craft project that amounts to a child's version of a scientific model.
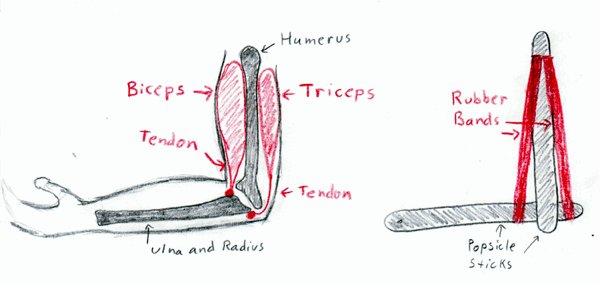
The arm from wrist to shoulder is more or less two sticks with a hinge in between, and the motion of the hinge is controlled primarily by two large muscles on opposite sides of the upper arm pulling on their respective tendons. To make a simplified model of it, we can use two popsicle sticks to represent bones, and two rubber bands to represent the muscles and tendons. We can make something like this:
There is probably a way to join the two popsicle sticks with tape, in which case the tape would represent ligaments, but I have chosen the simplicity of an axle-pin. I used an earring post and back, but you could just as well use a piece of paperclip, suitably bent. I have also placed a cargo hook on the far end of the “forearm”, representing a “hand”. The popsicle sticks are 4½ inches long, which I can only assume is a standard size, and the rubber bands are #33 size. The entire collection of pieces looks like this:
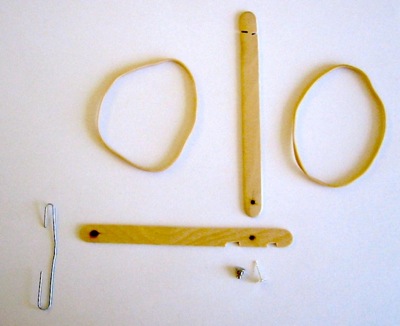
The assembly is pretty straightforward, but the popsicle sticks require some preparation. Both the “humerus” and the “ulna/radius” require one hole and two notches. If you wish to have a paperclip “hand” at the far end of the forearm, the “ulna/radius” stick will also require a second hole.
To make the holes, you could use a drill, but it is just as effective to heat the end of a straightened paperclip in a hot flame until it glows, then press it through the stick. (You can try candles, but I found that they didn't provide enough heat. You will probably find a chemistry burner, or a torch from your workshop or garage, or perhaps a culinary torch from your kitchen, to be much more effective.) The metal will lose its heat rapidly once you remove it from the flame, but with a hot flame, a large paperclip, and a little practice, you may be able to burn completely through the wood on the first try. For the notches on the “humerus”, a hacksaw works pretty well—the blade width is just about perfect for holding the rubber bands fairly securely. For the wider notches on the “ulna/radius”, I just whittled them out with a sharp knife. They should be moderately deep, with rectangular sides, otherwise the rubber bands will tend to slip out of the notches when the elbow is bent to large angles.
You may also find it helpful to wrap a little tape around the upper end of the “humerus”, to help hold the rubber bands in their slots.
An assembled version looks like this:
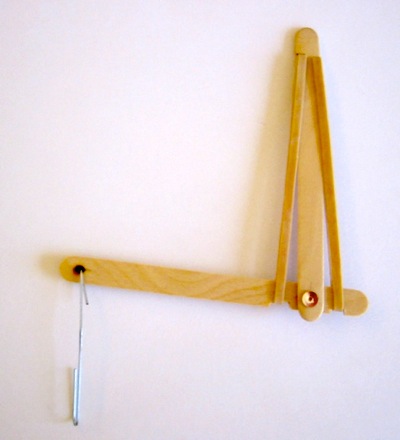
Once the arm is assembled, pulling on the “biceps” will fold the “elbow”, and pulling on the “triceps” will straighten the “elbow”. Students should be able to feel an analogous process going on in their own arms: If they sit and rest their forearm on their leg, palm up, and make it completely limp and relaxed, then try to lift their hand, they should be able to feel (with their other hand) their own biceps coming into action, and they should feel their biceps tendons popping out in the crook of the elbow. It may help to make the biceps work a little harder, by holding a weight of some kind in their hand, or by trying to lift their hand up against the bottom of their desk. If they start from the same position, but instead of trying to pick their hand up, they try to press the back of their hand forcefully down into their leg, they should feel their triceps working, and they may be able to feel (with their other hand) their triceps tendons becoming taut in the little hollow just above the tip of their elbows (i.e. just above the end of the ulna).